336x280(권장), 300x250(권장), 250x250, 200x200 크기의 광고 코드만 넣을 수 있습니다.

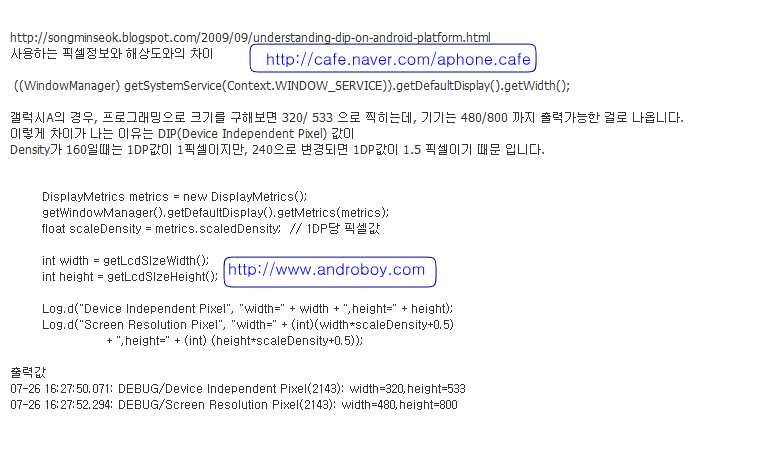
    public int getLcdSIzeWidth() {
        return ((WindowManager) getSystemService(Context.WINDOW_SERVICE)).getDefaultDisplay().getWidth();
    }
        
    public int getLcdSIzeHeight() {
        return ((WindowManager) getSystemService(Context.WINDOW_SERVICE)).getDefaultDisplay().getHeight();
    }


[출처] 안드로이드 개발자모임 카페의 에디터님의 글


블로그 이미지

By훈트

,
336x280(권장), 300x250(권장), 250x250, 200x200 크기의 광고 코드만 넣을 수 있습니다.
안녕하세요.
만들고자 하는 것은 다음과 같은 것입니다.

앨범Title(TextView) 보기(Button)
        사진들(GridView)

앨범Title(TextView) 보기(Button)
        사진들(GridView)

앨범Title(TextView) 보기(Button)
        사진들(GridView)

...

버튼을 누르면 GridView가 보였다 안보였다 하는 거죠.
위와 같은 custom View를 만들어서 여러개를 스크롤 뷰에 위치시켜서 
스크롤 될수 있도록하고자 합니다.
(즉, gridview가 스크롤이 되는건 아니고 전체화면이 스크롤이 되는 방식입니다.)

그래서
앨범Title(TextView) 보기(Button)
        사진들(GridView)
를 하나의 View로 만들기 위해서 XML 을 작성을 하고,

Custom View XML
01.<?xml version="1.0" encoding="UTF-8"?>
02.<LinearLayout xmlns:android="http://schemas.android.com/apk/res/android"
03.android:orientation="vertical"
04.android:layout_width="fill_parent"
05.android:layout_height="fill_parent"
06.
07.<LinearLayout
08.android:layout_width="fill_parent"
09.android:layout_height="fill_parent"
10.android:orientation="horizontal">    
11.<TextView 
12.android:id="@+id/gridtitle"
13.android:layout_width="wrap_content"
14.android:layout_height="wrap_content"
15.android:text="==Title=="
16./>   
17.<Button
18.android:id="@+id/gridextend"
19.android:layout_width="wrap_content"
20.android:layout_height="wrap_content"
21.android:text="-"
22./>
23.</LinearLayout>  
24.<GridView
25.android:id="@+id/griditem"
26.android:layout_width="fill_parent"
27.android:layout_height="fill_parent"
28.android:padding="10dp"
29.android:verticalSpacing="10dp"
30.android:numColumns="auto_fit"
31.android:columnWidth="60dp"
32.android:stretchMode="columnWidth"
33.android:scrollbars="none"
34.android:gravity="center"
35./>
36.</LinearLayout>

클래스 파일을 다음과 같이 작성을 했습니다.
Custom View Java파일
001.package com.android.GridTest;
002.import android.content.Context;
003.import android.graphics.Color;
004.import android.util.AttributeSet;
005.import android.view.LayoutInflater;
006.import android.view.View;
007.import android.view.ViewGroup;
008.import android.widget.BaseAdapter;
009.import android.widget.Button;
010.import android.widget.GridView;
011.import android.widget.ImageView;
012.import android.widget.LinearLayout;
013.import android.widget.ListAdapter;
014.import android.widget.TextView;
015.public class TitleGridView extends LinearLayout{
016.TextView mTitle = null;
017.Button mExtendBtn = null;
018.GridView mItemGrid = null;
019.Context mContext = null;
020. 
021.public TitleGridView(Context context, AttributeSet attrs) {
022.super(context, attrs);
023.initTitleGridView(context);
024.}
025. 
026.public TitleGridView(Context context) {
027.super(context);
028.initTitleGridView(context);
029.}
030. 
031.void initTitleGridView(Context context) {
032.mContext = context;
033. 
034.String infService = Context.LAYOUT_INFLATER_SERVICE;
035.LayoutInflater li = (LayoutInflater) getContext().getSystemService(infService);
036.View v = li.inflate(R.layout.titlegridview, this, false);
037.addView(v);   
038. 
039.mTitle = (TextView) findViewById(R.id.gridtitle);
040.mExtendBtn = (Button) findViewById(R.id.gridextend);
041.mItemGrid = (GridView) findViewById(R.id.griditem);
042.setAdapter(new ImageAdapter(mContext));
043. 
044.setFocusable(true);
045.setFocusableInTouchMode(true);
046. 
047.setBackgroundColor(Color.BLUE);
048. 
049.mExtendBtn.setOnClickListener(new OnClickListener() {
050.public void onClick(View v) {
051.if(mExtendBtn.getText().toString().trim().equals("-")) {
052.mExtendBtn.setText("+");
053.mItemGrid.setVisibility(View.GONE);
054.}
055.else {
056.mExtendBtn.setText("-");
057.mItemGrid.setVisibility(View.VISIBLE);
058.}
059.}
060.});
061.}
062. 
063.public void setAdapter(ListAdapter adapter) {
064.mItemGrid.setAdapter(adapter);
065.}
066. 
067.public class ImageAdapter extends BaseAdapter {
068.public ImageAdapter(Context c) {
069.mContext = c;
070.}
071.public int getCount() {
072.return mThumbIds.length;
073.}
074. 
075.public Object getItem(int position) {
076.return position;
077.}
078. 
079.public long getItemId(int position) {
080.return position;
081.}
082. 
083.public View getView(int position, View convertView, ViewGroup parent) {
084.ImageView imageView;
085.if (convertView == null) {
086.imageView = new ImageView(mContext);
087.imageView.setLayoutParams(new GridView.LayoutParams(45, 45));
088.imageView.setAdjustViewBounds(false);
089.imageView.setScaleType(ImageView.ScaleType.CENTER_CROP);
090.imageView.setPadding(8, 8, 8, 8);
091.imageView.setBackgroundColor(Color.BLUE);
092.else {
093.imageView = (ImageView) convertView;
094.}
095.imageView.setImageResource(mThumbIds[position]);
096.return imageView;
097.}
098.private Context mContext;
099.private Integer[] mThumbIds = {
100.R.drawable.sample_thumb_0, R.drawable.sample_thumb_1,
101.R.drawable.sample_thumb_2, R.drawable.sample_thumb_3,  //1
102.R.drawable.sample_thumb_4, R.drawable.sample_thumb_5,
103.R.drawable.sample_thumb_6, R.drawable.sample_thumb_7,  //2
104.R.drawable.sample_thumb_0, R.drawable.sample_thumb_1,
105.R.drawable.sample_thumb_2, R.drawable.sample_thumb_3,  //3
106.R.drawable.sample_thumb_4, R.drawable.sample_thumb_5,
107.R.drawable.sample_thumb_6, R.drawable.sample_thumb_7,  //4
108.R.drawable.sample_thumb_0, R.drawable.sample_thumb_1,
109.R.drawable.sample_thumb_2, R.drawable.sample_thumb_3,  //5
110.R.drawable.sample_thumb_4, R.drawable.sample_thumb_5,
111.R.drawable.sample_thumb_6, R.drawable.sample_thumb_7,  //6
112.R.drawable.sample_thumb_0, R.drawable.sample_thumb_1,
113.R.drawable.sample_thumb_2, R.drawable.sample_thumb_3,  //7
114.R.drawable.sample_thumb_4, R.drawable.sample_thumb_5,
115.R.drawable.sample_thumb_6, R.drawable.sample_thumb_7,  //8
116.R.drawable.sample_thumb_0, R.drawable.sample_thumb_1,
117.R.drawable.sample_thumb_2, R.drawable.sample_thumb_3,  //9
118.R.drawable.sample_thumb_4, R.drawable.sample_thumb_5,
119.R.drawable.sample_thumb_6, R.drawable.sample_thumb_7,  //10
120.};
121.}
122.}

main.xml은 다음과 같습니다.
main.xml
01.<?xml version="1.0" encoding="utf-8"?>
02.<ScrollView xmlns:android="http://schemas.android.com/apk/res/android"
03.android:id="@+id/myScroll"
04.android:layout_width="fill_parent"
05.android:layout_height="fill_parent"
06.android:scrollbarStyle="outsideInset"
07.android:verticalSpacing="10dip"
08.>
09.<LinearLayout
10.android:orientation="vertical"
11.android:layout_width="fill_parent"
12.android:layout_height="fill_parent"
13.>   
14.<com.android.GridTest.TitleGridView
15.android:id="@+id/Grid1"
16.android:layout_width="fill_parent"
17.android:layout_height="fill_parent"
18./>
19.<com.android.GridTest.TitleGridView
20.android:id="@+id/Grid2"
21.android:layout_width="fill_parent"
22.android:layout_height="fill_parent"
23./>
24.</LinearLayout>
25.</ScrollView>


그런데 몇가지 문제가 있는데 우선 가장 큰 문제는 이미지가 나오질 안네요.
ImageAdapter의 getView는 호출이 되는데, 이미지가 나오지 않습니다.
이미지가 안나오는 이유를 도저히 모르겠습니다.
조언좀 부탁드리겠습니다.


------------------------------------------------------------------------------------------------------------------

이거보고 CustomView를 만드는것에 대해 도움이 많이되어 포스팅했어요.
주말에 시간내서 저만의 CustomView를 만들어 수정해서 다시 포스팅 해야겠습니다.


블로그 이미지

By훈트

,
336x280(권장), 300x250(권장), 250x250, 200x200 크기의 광고 코드만 넣을 수 있습니다.
안드로이드 개발 중 필요한 자료 링크 ~!
<출처 : http://miksnug.pe.kr/26 >

1. 이미지와 텍스트가 같이 들어간 버튼 만들기

http://www.androidpub.com/15765


2.
버튼 색깔 바꾸기

http://stackoverflow.com/questions/1521640/standard-android-button-with-a-different-color


3. 
전체화면 사용하기 (Status bar, Title bar 숨기기)

http://www.androidpub.com/4710


4. 
ImageButton의 투명 효과 사용하기

http://joywoni.egloos.com/2847047 

android:background="#a0000000" 를 설정하면 배경이 투명해지므로 버튼 모양을 안봐도 된다.


5. 
Android 정리문서

http://sgap.springnote.com/pages/5076381

 SurfaceView와 SurfaceHolder.Callback, thread


6. 
네이티브 안드로이드 개발 관련 블로그

http://hybridego.net/


 7. 안드로이드 개발 각종 예제 소스

http://www.androidpeople.com/2010/01/


8. 메뉴별 이미지 처리

http://stackoverflow.com/questions/2065430/fixed-android-detecting-focus-pressed-color


9. 객체 Style 처리

http://www.anddev.org/viewtopic.php?p=37330


10. Button Highlight

http://www.androidpeople.com/category/android-tutorial/


11. SurfaceView

http://vissel.tistory.com/92


12. android:configChanges

http://www.androidpub.com/52338


13. 전원관리

http://samse.tistory.com/entry/AlarmManager-PowerManager


PowerManager pm = (PowerManager) getSystemService(Context.POWER_SERVICE);

 PowerManager.WakeLock wl = pm.newWakeLock(PowerManager.SCREEN_DIM_WAKE_LOCK, "My Tag");

 wl.acquire();

   ..screen will stay on during this section..

 wl.release();


14. 
하드웨어 콘트롤 관련 PDF 문서

http://mikechen.com/classes/2009-11-27%20NTU%20Mobile%20Phone%20Programming%20-%20Mike%20Chen%20-%2010%20-%20Security,%20Camera,%20Audio%20and%20Video.pdf


15. unique device ID 고유값 가져오기

http://developer.android.com/reference/android/telephony/TelephonyManager.html#getDeviceId%28%29


TelephonyManager mTelephonyMgr = (TelephonyManager)getSystemService(Context.TELEPHONY_SERVICE);

String imei = mTelephonyMgr.getDeviceId();


16. 
안드로이드 네이티브 라이브러리Ⅰ

http://www.imaso.co.kr/?doc=bbs/gnuboard.php&bo_table=article&wr_id=34284


[다른블로그] http://infodev.tistory.com/322

17. Introduction android

http://yotteum.tistory.com/entry/Introduction-Android

안드로이드 소개

바인딩 설명


18. 
안드로이드 - 버튼 OnClickListener 인터페이스 구현

http://woosa7.tistory.com/entry/%EC%95%88%EB%93%9C%EB%A1%9C%EC%9D%B4%EB%93%9C-%EB%B2%84%ED%8A%BC-OnClickListener-%EC%9D%B8%ED%84%B0%ED%8E%98%EC%9D%B4%EC%8A%A4-%EA%B5%AC%ED%98%84

http://www.cyworld.com/kkjw1801/3222534


19. Android - Change Tab Background

http://escomic.net/218


TabWidget에서 추가되는 Tab의 Background변경하기

Tab마다 View를 얻어와서 직접 BackgroundDrawable을 지정하고

아래 막대부분은 reflection을 이용하여 꽁수로 바꿔치기 한다

tab_indicator.xml, tab_bar_left.xml, tab_bar_right.xml 내용은 <selector>로 정의


20. 
KH5200 드라이버 설치

http://kil.imradriss.co.cc:8000/tc/30


21. DrawableTop 이미지 변경하기

http://www.androidpub.com/10154


보기 1 ================================================
Drawable img = context.getResources().getDrawable(R.drawable.filename);
Drawable img2 = img ;

보기 2 ================================================
Drawable img = context.getResources().getDrawable(R.drawable.filename);
Drawable img2 = context.getResources().getDrawable(R.drawable.filename);

보 기
 3 ================================================
Drawable img = context.getResources().getDrawable(R.drawable.filename);
Drawable img2 = context.getResources().getDrawable(R.drawable.filename2);
================================================

22. Layout 사이즈 동적변경

http://www.androidpub.com/40481

http://gall.dcinside.com/list.php?id=accident2&no=1195485

LinearLayout ll = (LinearLayout)findViewById(R.id.write_LinearLayout);

LinearLayout.LayoutParams params = new LinearLayout.LayoutParams(LinearLayout.LayoutParams.FILL_PARENT,

400);  // 400 이라는 높이를 지정

ll.setLayoutParams(params);

23. Android UI 개발기: XML 안쓰고 UI 코딩하기

http://xrath.com/2009/11/android-ui-%EA%B0%9C%EB%B0%9C%EA%B8%B0-xml-%EC%95%88%EC%93%B0%EA%B3%A0-ui-%EC%BD%94%EB%94%A9%ED%95%98%EA%B8%B0/


24. 전화상태 변화감지 리스너

PhoneStateListener 예제

http://www.kandroid.org/board/board.php?board=AndroidTechQnA&page=124&command=body&no=432


MyPhoneStateListener phoneListener=new MyPhoneStateListener();

TelephonyManager telephonyManager  =(TelephonyManager)getSystemService(TELEPHONY_SERVICE);

telephonyManager.listen(phoneListener,PhoneStateListener.LISTEN_CALL_STATE);


public class MyPhoneStateListener extends PhoneStateListener {...}


25. 
안드로이드 하드웨어관련 자료(통화,폰상태,네트워크,카메라,센서)

http://gtko.springnote.com/pages/5396297

http://developer.android.com/reference/android/content/Intent.html

http://developer.android.com/reference/android/net/ConnectivityManager.html

android.net.conn.CONNECTIVITY_CHANGE


26. sms 수신해서 요약내용 보여주기

http://www.anddev.org/recognize-react_on_incoming_sms-t295.html

http://flytop.tistory.com/62

android.provider.Telephony.SMS_RECEIVED


// SMS 수신 감지 등록

IntentFilter smsRcvFilter = new IntentFilter(CSmsReceiver .ACTION);

smsReceiver =  new CSmsReceiver();

registerReceiver(smsReceiver, smsRcvFilter);


//if(smsReceiver != null) {

//    unregisterReceiver(smsReceiver);

//}


<!-- SMS Broadcast Receiver 등록 -->

<receiver android:name=".common.CSmsReceiver">

<intent-filter>

<action android:name="android.provider.Telephony.SMS_RECEIVED" />

</intent-filter>

</receiver>


27. 
BroadcastReceiver XML설정하기

http://www.androidpub.com/186727

<receiver android:name="리시버클래스" android:enabled="true">
<intent-filter><action android:name="android.net.conn.CONNECTIVITY_CHANGE" /></intent-filter>
</receiver>


28. 
각종 Management 클래스

http://www.imaso.co.kr/?doc=bbs/gnuboard.php&bo_table=article&page=10&wr_id=34565


29. 
Dialog 구조 분석

(아이콘,텍스트 위치등)

http://sgap.springnote.com/pages/5235569


30. SMS 수신시 Toast 메시지 출력

http://www.androidpub.com/138352


Intent sendIntent = new Intent(Intent.ACTION_SEND); sendIntent.addCategory("android.intent.category.DEFAULT");      

sendIntent.putExtra("address", PhoneNumberUtils.formatNumber(phoneNumber));

sendIntent.putExtra("exit_on_sent"true);

sendIntent.putExtra("subject""TEST MMS");

sendIntent.putExtra("sms_body""MMS 테스트입니다.");

context.startActivity(sendIntent);

31

Broadcast Receiver :네트워크상태 체크

http://www.anddev.org/viewtopic.php?p=32088


OnReceive 메소드 내에서..

ConnectivityManager connec=  (ConnectivityManager)getSystemService(Context.CONNECTIVITY_SERVICE);

if(connec.getNetworkInfo(0).getState()==NetworkInfo.State.CONNECTED||connec.getNetworkInfo(1).getState()==NetworkInfo.State.CONNECTING ) {

text.setText("hey your online!!!");

//Do something in here when we are connected

}

elseif(connec.getNetworkInfo(0).getState()== NetworkInfo.State.DISCONNECTED||connec.getNetworkInfo(1).getState() == NetworkInfo.State.DISCONNECTED ) {

text.setText("Look your not online");

}

32. 안드로이드 API기능 설명

http://www.jopenbusiness.com/mediawiki/index.php/Android


33. Actions for BroadcastReceiver

http://www.dearsoft.org/tag/broadcastreceiver/


34. Layout.out.xml 생성되는 문제

http://www.androidpub.com/101585

main.out.xml 파일은 삭제해 주세효~
그건 xml 을 펼쳐둔 상태에서 Run 을 하면 만들어 지는데, 그럼 제대로 실행이 되지 않아효~

35. Multi Touch

http://www.mentby.com/naya/multitouch-support-in-android-20.html

http://gist.github.com/324166

2.0 부터 지원

36. ScrollView 스크롤 하단으로 내리기

http://www.anddev.org/viewtopic.php?p=36823

sv.post(new Runnable() {

             public void run() {

                           sv.fullScroll(ScrollView.FOCUS_DOWN);

             }

});

37. Timer 만들기

http://developer.android.com/intl/de/resources/articles/timed-ui-updates.html

http://www.developer.com/java/ent/print.php/3589961

http://www.androidpub.com/4374

http://blog.inculab.net/25


38. Logcat 동작안하는 에러 발생시 처리

(Could not create the view: For input string: "")

http://www.mail-archive.com/android-developers@googlegroups.com/msg60683.html

hide details Aug 18
 
I have had the same problem.
 
The logcat view crashes after I inserted a filter containing a ":" in
the filtername.
I solved the problem by changing the settings in the file
".metadata/.plugins/org.eclipse.core.runtime/.settings/
com.android.ide.eclipse.ddms.prefs" placed in the workspace of
eclipse.
com.android.ide.eclipse.ddms.logcat.filters= was the key of the fault
setting.


39. SSL 인증서 등록하기

http://www.java2go.net/blog/197?TSSESSION=1202a1a23fa67bae15ce3ab15a5a0cea

http://www.virgo81.net/70

http://crazybob.org/2010/02/android-trusting-ssl-certificates.html

http://www.bouncycastle.org/latest_releases.html

keytool -import -keystore cacerts -file C:\cert\TrialRootCA.cer -alias afcert


40. 
Signing By Private Key

http://www.devx.com/wireless/Article/39972/1954


41. 영상 녹화하기

http://www.anddev.org/viewtopic.php?p=24723#24723


42. SurfaceView 의 이해

http://androidhuman.tistory.com/entry/카메라를-이용하자-SurfaceView에-대한-이해


43. 안드로이드 JAVA 소스

http://anddev.tistory.com/77

http://anddev.tistory.com/50

http://anddev.tistory.com/42

{SDK_LOCATION}/platforms/1.5/sources


44. 
SSL 인증서 우회하기

http://www.experts-exchange.com/Programming/Languages/Java/Q_23063074.html

http://7bee.j2ee.us/blog/2008/03/28/1206704820000.html


45. JAVA SSL 관련 공식문서

http://java.sun.com/javase/6/docs/technotes/guides/security/jsse/JSSERefGuide.html

http://java.sun.com/javase/6/docs/technotes/guides/security/jsse/JSSERefGuide.html#CreateKeystore

http://java.sun.com/javase/6/docs/technotes/guides/security/jsse/JSSERefGuide.html#CodeExamples

http://java.sun.com/javase/6/docs/technotes/guides/security/jsse/samples/sockets/client/SSLSocketClient.java


46. SSL 인증서 증명에러 해결하기

http://blog.naver.com/PostView.nhn?blogId=fidelis98&logNo=140103425406&redirect=Dlog&widgetTypeCall=true

http://code.google.com/p/android/issues/detail?id=1946

http://developer.android.com/intl/de/reference/javax/net/ssl/TrustManager.html

http://mail-archives.apache.org/mod_mbox/hc-httpclient-users/200906.mbox/

http://www.exampledepot.com/egs/javax.net.ssl/GetCert.html?l=rel

http://www.android-portal.com/2007/12/20/secure-server-socket-with-tlsssl-on-android-fails/

http://www.exampledepot.com/egs/javax.net.ssl/TrustAll.html?

http://blog.keduall.co.kr/lsb76/entry/자바-SSL-접속-오류

해결방법http://www.exampledepot.com/egs/javax.net.ssl/TrustAll.html


// Create a trust manager that does not validate certificate chains

TrustManager[] trustAllCerts = new TrustManager[]{

   new X509TrustManager() {

        public java.security.cert.X509Certificate[] getAcceptedIssuers() {

             return null;

        }

        public void checkClientTrusted( java.security.cert.X509Certificate[] certs, String authType) {

        }

        public void checkServerTrusted( java.security.cert.X509Certificate[] certs, String authType) {

        }

    }

};


47. 
안드로이드 Service 에서 Activity 를 실행하는 방법 

http://blog.naver.com/huewu/110084868855


Intent i = new Intent(this, ServiceTest.class);

PendingIntent p = PendingIntent.getActivity(this, 0, i, 0);

try {

           p.send();

} catch (CanceledException e) {

           e.printStackTrace();

}


48. 안드로이드 이미지(사진) 불러오기

http://shinluckyarchive.tistory.com/469

http://developer.android.com/reference/android/graphics/BitmapFactory.Options.html


import android.graphics.Bitmap;
import android.graphics.BitmapFactory;
...
BitmapFactory.Options options = new BitmapFactory.Options();
options.inSampleSize = 8;  
Bitmap src = BitmapFactory.decodeFile(fileListSDCard[i], options);
Bitmap resized = Bitmap.createScaledBitmap(src, 100, 100, true);


49. SSL 인증키 무조건 우회하기

http://groups.google.com/group/android-developers/browse_thread/thread/62d856cdcfa9f16e

public class _FakeX509TrustManager implements X509TrustManager { 
        private static TrustManager[] trustManagers; 
        private static final X509Certificate[] _AcceptedIssuers = new 
X509Certificate[] {};
 
        @Override 
        public void checkClientTrusted(X509Certificate[] chain, String 
authType) throws CertificateException {
 
        } 
        @Override 
        public void checkServerTrusted(X509Certificate[] chain, String 
authType) throws CertificateException {
 
        } 
        public boolean isClientTrusted(X509Certificate[] chain) { 
                return true; 
        } 
        public boolean isServerTrusted(X509Certificate[] chain) { 
                return true; 
        } 
        @Override 
        public X509Certificate[] getAcceptedIssuers() { 
                return _AcceptedIssuers; 
        } 
        public static void allowAllSSL() { 
                HttpsURLConnection.setDefaultHostnameVerifier(new HostnameVerifier() 
             {
 
                        @Override 
                        public boolean verify(String hostname, SSLSession session) { 
                                return true; 
                        } 
                }); 
                SSLContext context = null; 
                if (trustManagers == null) { 
                        trustManagers = new TrustManager[] { new _FakeX509TrustManager() }; 
                } 
                try { 
                        context = SSLContext.getInstance("TLS"); 
                        context.init(null, trustManagers, new SecureRandom()); 
                } catch (NoSuchAlgorithmException e) { 
                        e.printStackTrace(); 
                } catch (KeyManagementException e) { 
                        e.printStackTrace(); 
                } 
                  
HttpsURLConnection.setDefaultSSLSocketFactory(context.getSocketFactory()); 
        } 
}

50. 효과음 관련 자료(Creating Sound Effects in Android)

http://www.androidpub.com/257540#4
블로그 이미지

By훈트

,
336x280(권장), 300x250(권장), 250x250, 200x200 크기의 광고 코드만 넣을 수 있습니다.

안드로이드에서 전체화면을 사용하기 위해서는 상태바(Status Bar)와 타이틀바(Title Bar)를 숨겨야 합니다. 숨기는 방법은 여러가지가 존재하는데 그 중 몇가지 방법을 정리하도록 하겠습니다.

1. 미리 정의된 Theme 사용하기

1.<activity android:name=".MyActivity"
2.android:theme="@android:style/Theme.NoTitleBar.Fullscreen"  >
AndroidManifest.xml 에서 Activity의 Theme를 위와 같이 설정해주면 Status Bar와 Title Bar가 모두 없는 상태가 됩니다. 

1.<activity android:name=".MyActivity"
2.android:theme="@android:style/Theme.NoTitleBar"  >
이렇게만 한다면 TitleBar만 없는 상태가 됩니다.

2. 내가 정의한 Theme 에서 설정하기

1.<item name="windowNoTitle">true</item>
Title Bar만 없는 상태로 만들기

1.<item name="windowFullscreen">true</item>
Status Bar와 Title Bar 모두 없는 상태 만들기

3. Java Code에서 설정하기

1.requestWindowFeature(Window.FEATURE_NO_TITLE);
Title Bar 없는 상태로 만들기

1.getWindow().setFlags(WindowManager.LayoutParams.FLAG_FULLSCREEN,
2.WindowManager.LayoutParams.FLAG_FULLSCREEN);
Status Bar 없는 상태로 만들기. Theme 설정과 다른 것은 Fullscreen Flag를 주더라도 Title Bar는 남아있습니다. 


블로그 이미지

By훈트

,
336x280(권장), 300x250(권장), 250x250, 200x200 크기의 광고 코드만 넣을 수 있습니다.


가로화면, 세로화면 전환시 문제점

가로, 세로로 화면을 전환할때 마다

onCreate() -> onStart() -> onResume()

이런 순서대로 실행됩니다.

만약 파일을 읽거나 네트워크처리가 들어가게되면 중복처리가 발생할 수도 있습니다.

이걸 막는 방법에는 몇가지가 있는듯 하나

제일 간단한 방법인거 같은 AndroidManifest.xml 을 수정하는 방법을 적어봅니다.

1 <activity android:name="testA">
2 <activity android:name="testB" android:configchanges="orientation">
3 <activity android:name="testC"android:configchanges="keyboard|keyboardHidden|orientation">
4 </activity></activity></activity>

testA 액티비티는 아무런 수정이 없으므로 위와 같은 문제가 존재합니다.

testB 액티비티는 가로, 세로 화면 전환에서는 위의 문제가 발생하지 않습니다.

testC 액티비티는 가로, 세로 화면 전환과 쿼티자판을 열고 닫을때에도 위의 문제가 발생하지 않습니다.


화면 전환이나 쿼티자판을 열고 닫을때에도 onCreate -> onStart() -> onResume() 이 실행되지 않게 하려면 이방법이 가장 쉬운 방법이 될것 입니다.


[출처] http://yoonhg84.tistory.com/90

블로그 이미지

By훈트

,
336x280(권장), 300x250(권장), 250x250, 200x200 크기의 광고 코드만 넣을 수 있습니다.

[View Attribute]


XML에서 각각의 뷰가 가지는 속성을 Attribute로 지정해할 수 있습니다. 모든 View가 공통적으로 가지고 있는 Attribute에 대해서 먼저 설명하도록 하겠습니다.


layout_width, layout_height 


뷰의 넓이와 높이를 지정합니다. 


값으로 fill_parent, wrap_content 혹은 절대적인 수치를 가질 수 있습니다. 

fill_parent는 컨테이너 즉 부모가 가지는 길이를 모두 채울때 사용하고, 

wrap_content는 해당 뷰가 그려질 수 있게 필요한 길이만 차지한다는 것을 나타냅니다. 


절대적인 값도 넣을 수 있는데 픽셀의 경우 "100px", "100dp", "100sp" 처럼 수치와 단위를 써서 지정해줍니다. 

사용할 수 있는 단위는 px, in, mm, pt, dp, sp등이 있는데 주로 dp, sp, px이 주로 쓰입니다. 

px는 픽셀을 나타냅니다.

dp는 Density-independent Pixel이라고 화면의 밀도의 변화에 독립적으로 1dp는 160dpi의 화면에서의 1px에 대응됩니다. 

sp는 Scale-independent Pixel 이라고 하여 사용자의 폰트 선호도에 따라 크기가 달라지며 주로 폰트 사이즈 설정에 사용됩니다.


background


 배경색 혹은 그림을 지정해줍니다.

색은 #RGB, #ARGB, #RRGGBB, #AARRGGBB 의 포맷으로 지정해 줄 수 있습니다. 

통일성을 위해 보통 #AARRGGBB 포맷을 사용합니다. 

제일 앞에 AA는 투명도를 의미하고 나머지 부분은 RGB값을 의미합니다. 

투명도인 AA는 00이 완전 투명, FF가 불투명이 됩니다. 

예를 들어 android:background="#FFFF0000"로 지정해주면 빨간색으로 배경을 칠하게 됩니다. 

배경그림을 지정해줄 수도 있는데 android:background="@drawable/background_image" 와 같은 형태로 사용가능합니다. 

배경 그림은 리소스에 들어있는 jpg, png등의 그림을 배경으로 지정할 때 사용합니다.


visibility 


뷰가 화면에 보이게 할지 안보이게 할지를 설정합니다. 

visible, invisible, gone의 값을 가질 수 있습니다. 


visible 화면에 보임, 

invisible 화면에 보이지 않으나 공간은 차지함, 

gone 화면에 보이지도 않고 공간도 차지 하지 않음

블로그 이미지

By훈트

,
336x280(권장), 300x250(권장), 250x250, 200x200 크기의 광고 코드만 넣을 수 있습니다.
main.xml-------------->
<com.drawbitmap.MyView // 이곳에 package 경로와 클래스명을 적는다.
android:id="@+id/myView"
android:layout_below="@id/top"
android:layout_above="@id/btn"
android:layout_width="fill_parent" 
android:layout_height="wrap_content"
/>

MyView.java------------>
// 사용하려는 목적에 따라 기타 함수는 다르겠지만 아래의 것들은 꼭 있어야 한다.
// 없으면 xml에서 속성들이 적용되지 않아서 컴파일은 되어도 실행이 안된다.
public class MyView extends View {
public MyView(Context context) {
super(context);
}

public MyView(Context context, AttributeSet attrs) {
super(context, attrs);
}
public MyView(Context context, AttributeSet attrs, int defStyle) {
super(context, attrs, defStyle);
}
}
블로그 이미지

By훈트

,
336x280(권장), 300x250(권장), 250x250, 200x200 크기의 광고 코드만 넣을 수 있습니다.
학교 안드로이드 수업시간에 참고했던 PPT 강의자료입니다.
같이 공부하는분들 처음 안드로이드 공부시작하실때 도움될까 싶어 올립니다.
자료의 출처는 교수님께 받았기에 잘모르겠다는.... 아마 구글의 안드로이드 책을 참고한듯한 느낌이 강하게 !!ㅋ

파일 용량 제한문제로 알집파일 6개로 압축해서 올리겠습니다.
블로그 이미지

By훈트

,
336x280(권장), 300x250(권장), 250x250, 200x200 크기의 광고 코드만 넣을 수 있습니다.
학교 안드로이드 수업시간에 참고했던 PPT 강의자료입니다.
같이 공부하는분들 처음 안드로이드 공부시작하실때 도움될까 싶어 올립니다.
자료의 출처는 교수님께 받았기에 잘모르겠다는.... 아마 구글의 안드로이드 책을 참고한듯한 느낌이 강하게 !!ㅋ

파일 용량 제한문제로 알집파일 6개로 압축해서 올리겠습니다.
블로그 이미지

By훈트

,
336x280(권장), 300x250(권장), 250x250, 200x200 크기의 광고 코드만 넣을 수 있습니다.
학교 안드로이드 수업시간에 참고했던 PPT 강의자료입니다.
같이 공부하는분들 처음 안드로이드 공부시작하실때 도움될까 싶어 올립니다.
자료의 출처는 교수님께 받았기에 잘모르겠다는.... 아마 구글의 안드로이드 책을 참고한듯한 느낌이 강하게 !!ㅋ

파일 용량 제한문제로 알집파일 6개로 압축해서 올리겠습니다.

블로그 이미지

By훈트

,